Build a Table Saw Tapering Jig
Cutting tapered work pieces on a table saw can be frustrating and even quite dangerous.
For accuracy and safety, you must move the wood in a perfectly straight line parallel to the saw blade. Any side to side movement will result in inaccurate cuts and may even cause the wood to kick back at you.
If you only need to cut one tapered work piece, simply position the work piece with the cut marks over the edge of the sled and clamp it in place with hold down clamps.
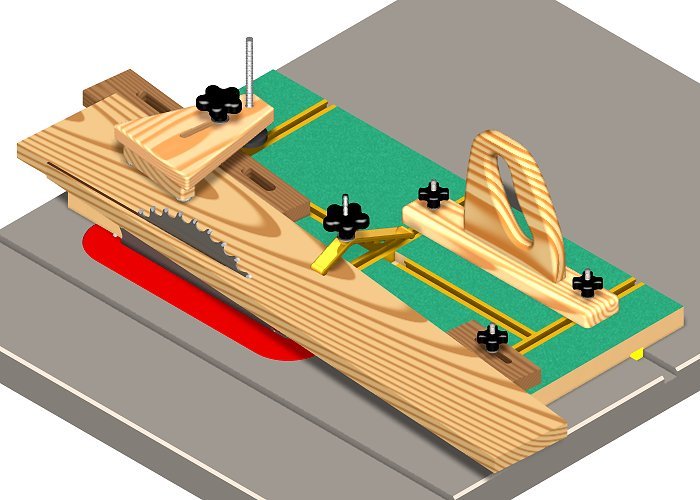
To accurately cut one or multiple tapered pieces, this jig is the tool you need. With this taper jig, you can create as many tapered work pieces as you need. Each piece wil be exactly like all the others.
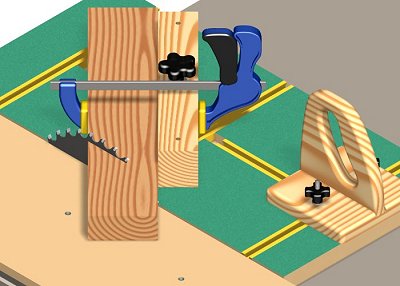
This jig provides three locked down alignment points to ensure accurate placement.
- The End Positioner's stop tab establishes the correct front to back position.
- The End Positioner's side surface establishes the rear side to side position.
- The Alignment Block establishes the front side to side position.
- The long bolt on the End Positioner serves two purposes: It allows you to tighten the positioner securely to the sled and, at the same time, you can clamp the work piece with the three point clamp using the same bolt.
Note: Free plans for the Safety Handle is available on a separate page. See the right side bar links above.
Special Hardware You'll Need

Note: If you have a bench grinder, you can create your own T-Track bolts from carriage bolts by gringing the sides and top of the carriage bolt-head so the head of the bolt slides smoothly thru the T-Track.
- Two threaded knobs with 1/4" threads. (Assuming your T-Track uses 1/4" bolts.)
- One 4 1/2" long by 1/4" hex head bolt.
- One 2 1/2" long by 1/4" hex head bolt.
- Two 1/4" flat washers.
Step 1 - Cut the Parts
You'll need:
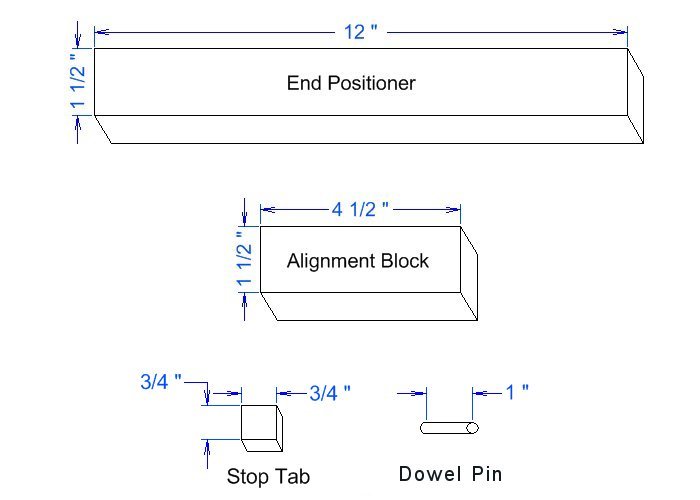
- One 1 1/2" by 12" piece of 3/4" wood for the End Positioner
- One 1 1/2" by 4 1/2" piece of 3/4" wood for the Alignment Block
- One 3/4" by 3/4" by 3/8" thick Stop Tab
- One 1" long by 1/4" diameter dowel pin.
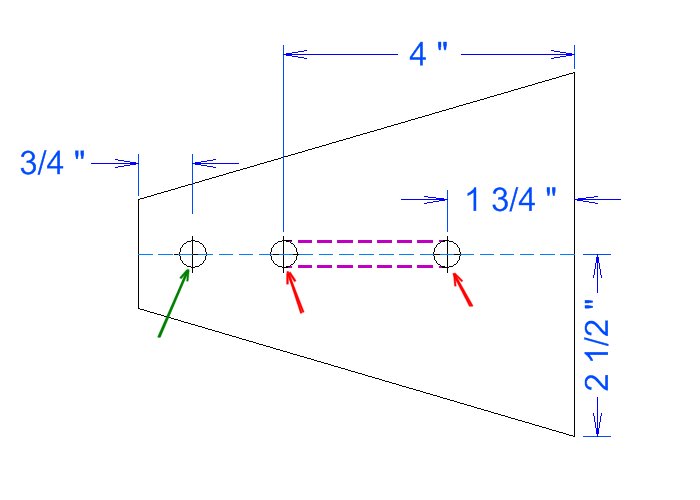
Step 2 - Drill the Holes
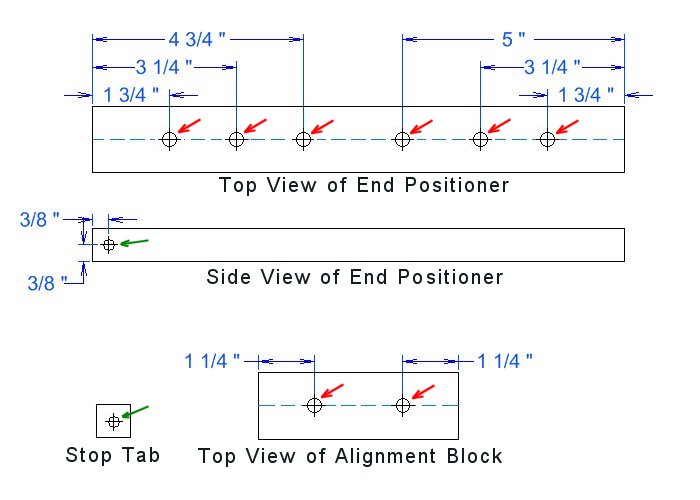
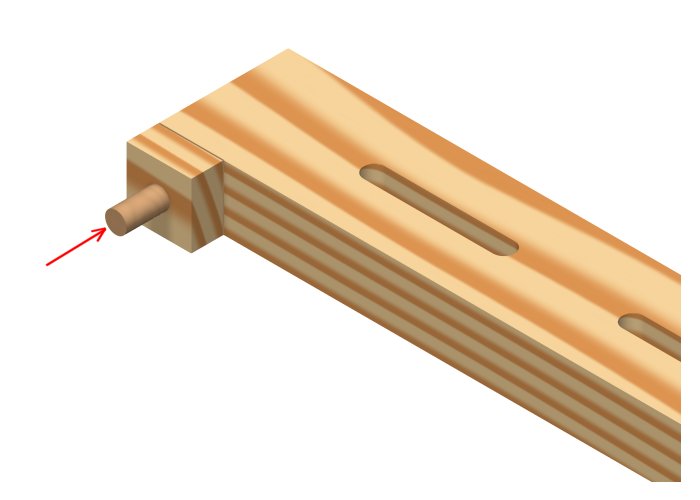
Drill a 1/4" hole about 3/4" deep into the side of the End Positioner for the dowel pin as indicated by the green arrow. br>
Drill a 1/4" hole through the center of the Stop Tab for the dowel pin as indicated by the green arrow.
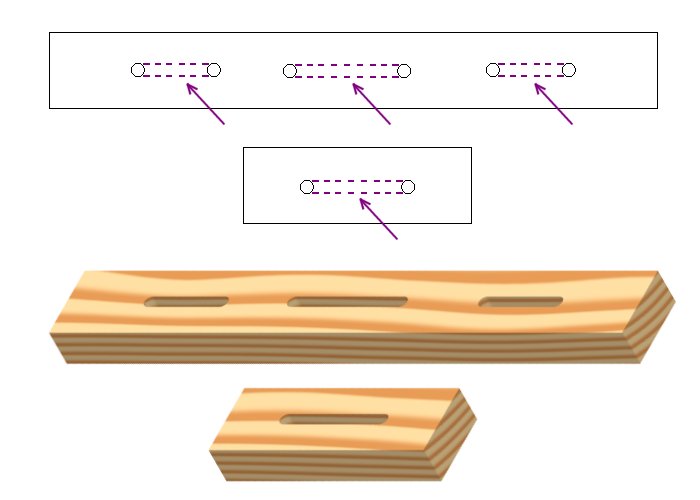
Step 3 - Cut the Slots
Step 4 - Attach the Stop Tab to the End Positioner
Tap the dowel pin in so it is flush with the surface of the Stop Tab. Make sure the top and bottom surfaces of the tab are flush with the top and bottom surfaces of the End Positioner. Clamp with a C-Clamp.
Step 5 - Insert the T-Track Bolt
Congratulations! Your Work Piece Positioning Parts are Complete!
Now, Let's Make the Three Point Hold Down Clamp
Step 6 - Hardware You'll Need for the Clamp
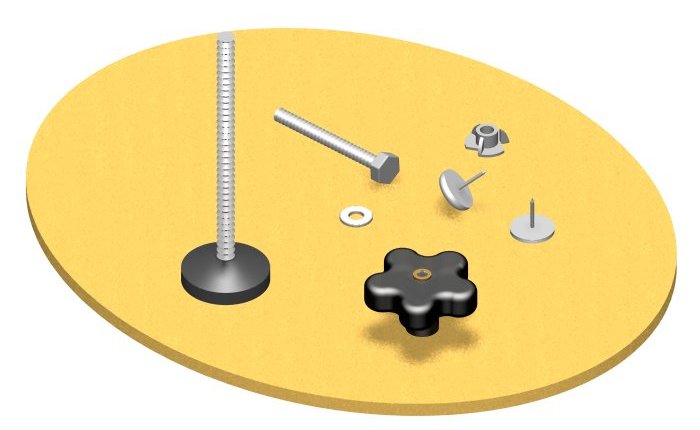
- One large toggle clamp foot with 6" thread length. The one I used came from Amazon.com. Rockler Woodworking also has them.
- Note: You could use a simple hex head bolt. However, it may damage the sled surface.
- Two 3/4" nail on nylon furniture base glides. (Available in local hardware stores.)
- One 5/16 by 18 TPI Tee Nut.
Step 7 - Cut the Clamp Parts

Step 8 - Drill the Clamp Body Holes
Drill three holes through the Clamp Body as indicated in the drawing above.
The hole indicated by the green arrow should be the correct diameter for the Tee-Nut to be pressed into.
The two holes indicated by the red arrows should be 5/16".
Finally, use your jig saw to open a slot between the two holes indicated by the dotted purple lines.
Step 9 - Drill the Nylon Pad Holes
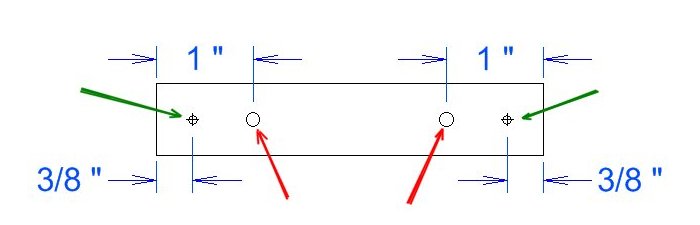
Drill two 9/64" holes completely through the Pad Block as indicated by the red arrows in the drawing above. Countersink these two holes for No. 6 flathead screws.
Choose a drill bit about the size of the nails on the nylon pads and drill holes about 1/4" deep as indicated by the green arrows. This is to prevent the wood from splitting.
Step 10 - Assemble the Clamp
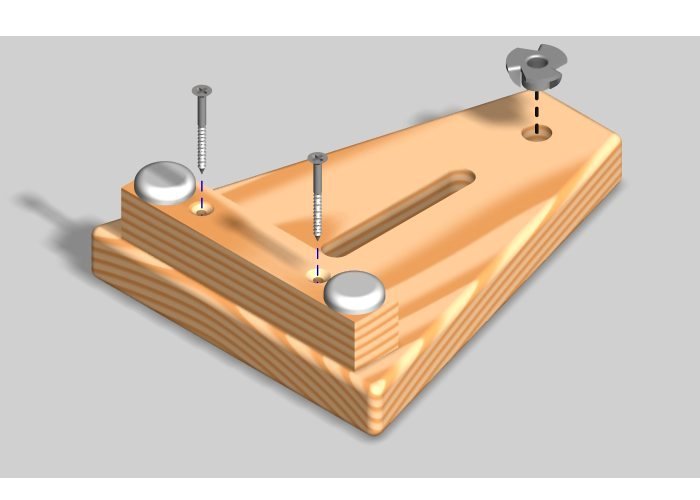
Apply glue to the mating surfaces and secure the Pad Block to the Clamp Body with 1 1/4" No. 6 flathead screws as shown in the drawing above.
Next, tap the Tee-Nut and nylon pads in place as shown.
Step 11 - Insert the Adjustable Clamp Foot
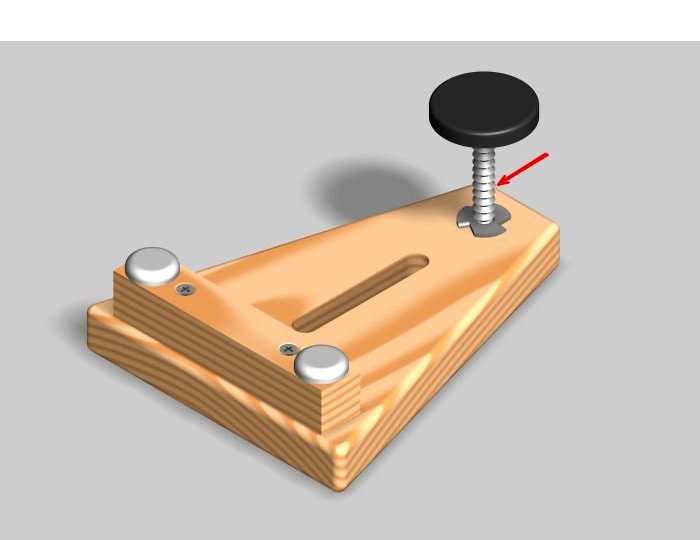
Finally, insert the Toggle Clamp Foot into the Tee-Nut as shown.
Congratulations! You clamp is ready to use.
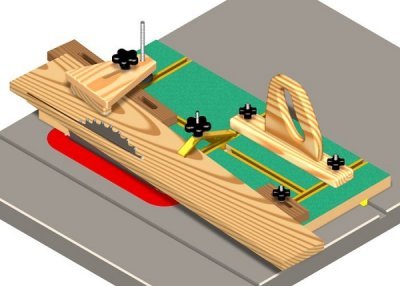
Step 12 - Placing the Taper Jig Guides
Lower the saw blade below the surface of the table saw top. Then, place your table saw sled on the right side of the saw blade with the sled's miter slot bar in the Table saw miter slot.
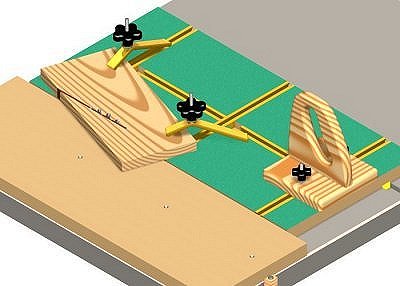
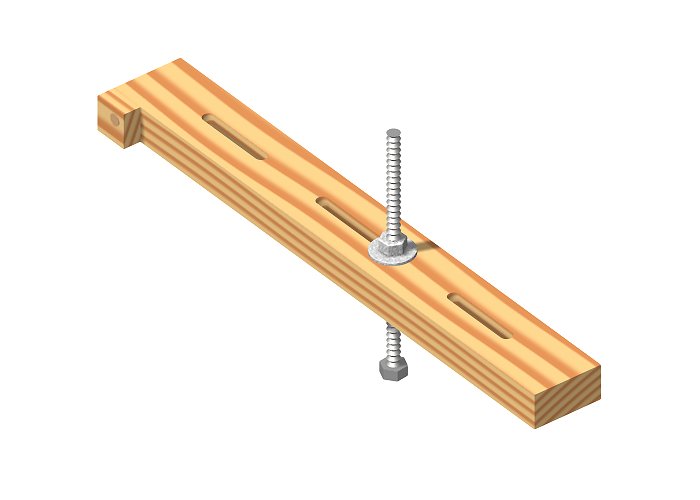
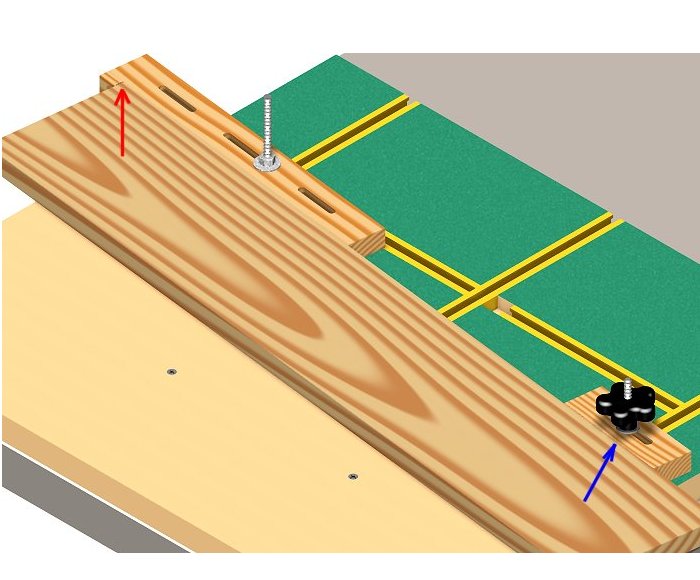
Position the workpiece as needed for the correct taper cut. Then, secure the End Positioner at the far end of the workpiece as indicated by the red arrow. Secure the End Positioner with the T-Track bolt and hex nut. Be sure the hex nut is tightened enough that the it will not move.
Next, position the alignment Block along the edge of the work piece as indicated by the blue arrow. Secure the Alignment Block with the knob to ensure it will not move as shown above.
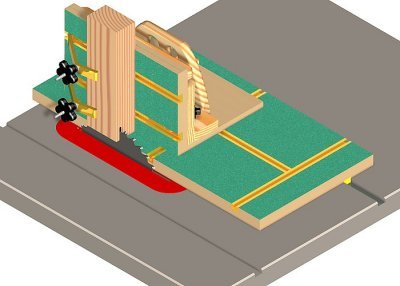
Step 13 - Clamping the Workpiece

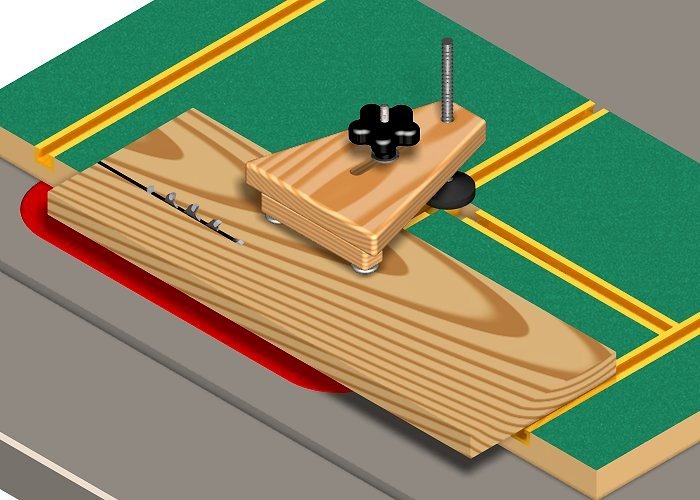
Set your three point clamp down over the long bolt as indicated by the red arrow in the picture above. Tighten the knob on this bolt to clamp the work piece.
Use a regular aluminum hold down clamp to secure the work piece in a second place as indicated by the blue arrow.
Remember, you will not be holding the work piece to the sled with your hands. Be sure the work piece is tightened enough that it will remain securely in place on the sled as the cuts is being made.
Step 14 - Making the Cut
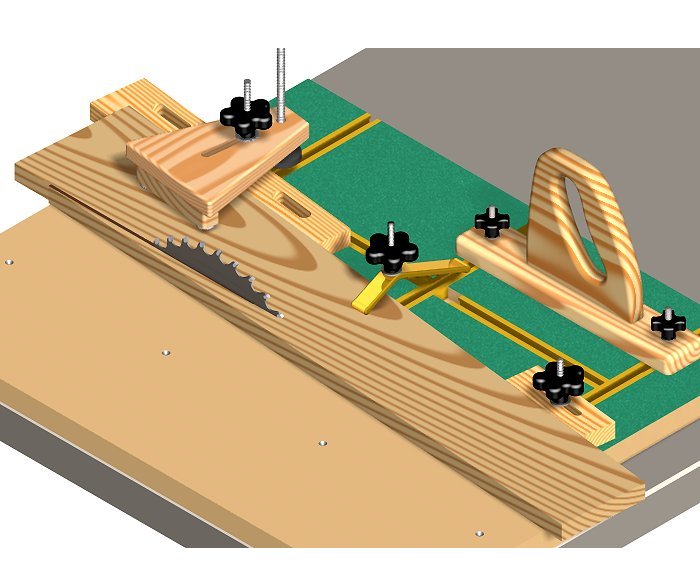
Attach a safety handle to the sled and you're ready to cut tapers!
Congratulations! Your Table Saw Tapering Jig is Complete!
Copyright Notice
We hope you enjoy the free woodworking plans offered on this site. You are invited to download or print any of the plans free of charge for your own use. Please be aware that the plans are copyrighted and may not be distributed by any person or company except here on www.bobsplans.com.
If you know a friend that would like a copy of any of our plans, please send him/her a link to our site so they can download them from here. We always welcome new visitors.
Please note that there is no PDF file for these Tapering Jig Plans plans. You can either view these plans in your shop with your phone or mobile device or press the "Print These Plans" button below to print the plans on paper.
TaperJig.htm (12-31-2023)